SkillPort 6.4 Users Guide
Welcome To SkillPort 6.4
SkillPort™ is a web-based e-Learning portal where you can access a range of training resources at work, at home, and on the road ... whenever and wherever you have the need and time.
SkillPort allows you to
-
access a variety of instructional and assessment learning events from the SkillSoft Catalog
-
follow learning plans created for you by your manager or build your own in the My Plan area
-
add learning events that are outside your formal learning plan to My Favorites for quick access
-
use the My Report area to view your progress and test scores
-
add learning programs to My Enrollments
-
customize your SkillPort experience by choosing player skins, personalizing your shortcuts, or selecting a different language for the site
To access SkillSoft’s courses, log in to the SkillPort site:
1. Open your web browser
2. Type the appropriate URL for your SkillPort site in the address line.
3. Press Enter. The Login Page displays.
4. Enter your User ID and Password.
5. Select Login.
The SkillPort site is displayed.
Home Page
The Home page appears when you login to SkillPort. It presents summary information to help you develop your individualized learning plan and track your progress. You can access all of SkillPort's various features and learning resources from this page.
Login Information
Your first name - as entered in the registration form, the current date (in MM, DD, YYYY format) and the login time (in HH: MM.) appears in the top-left section of the SkillPort interface.
Site menu
The site menu appears in the top-right section of the SkillPort interface. The options allow you to customize your user profile and Shortcuts, access the online help, log out of SkillPort, or view the Site Map.
Shortcuts menu
The Shortcuts menu appears in the left section of the SkillPort interface and contains links to My Plan, My Favorites, My Report, and Admin Tasks.
SEARCH-and-LEARN™
SEARCH-and-LEARN lets you search the entire SkillPort site for learning events by typing in keywords.
My Plan
The My Plan section contains links to the learning events that have been added to your formal learning plan, either by you or by your training administrator. You can also use it to organize your learning events into custom learning paths.
My Favorites
The My Favorites area is where you can store links to certain types of learning event, such as SkillBriefs, Job Aids, and books, for quick access.
My Report
The My Report section contains information regarding the number of courses you have started and completed.
Company News
The Company News scrolling list displays links to various topics relating to news and learning events relevant to your company.
SkillPort presents learning events in an expandable catalog of assigned content. Content can be organized in standard curricula, by certification path, or Learning Program. Depending upon the size of your course library, the SkillPort catalog may contain thousands of learning events, including:
 Courses Courses |
 Custom Content Custom Content |
 SkillBriefs SkillBriefs |
 Mentoring Mentoring |
 Simulations Simulations |
 Express Guides Express Guides |
 Job Aids Job Aids |
 Course Evaluations Course Evaluations |
 TestPrep Exams TestPrep Exams |
 Practice Lab Practice Lab |
 Instructor-Led Training Instructor-Led Training |
 Projects Projects |
 Books Books |
|
Note: SkillBriefs and Job Aids are available from the Course summary page. Mentoring objects, if available for your organization, appear in the Certification View.
Curricula View
Learning events are organized into curricula that keep related subjects together. The curricula are organized by subject-matter, represented by a folder icon that contains additional sub-categories or the actual learning events. As you select a category, the contents of the selected item are displayed in the catalog.
To view the contents of the catalog, click through the catalog hierarchy. A breadcrumb trail at the top of the course information panel will show you where you are. You can also click the View Expanded Catalog link to see the entire catalog; however, this may take some time to display, depending on the amount of content you have access to.
Note: Selecting View Expanded Catalog may fail on catalogs containing over 500 courses.
To access a learning event, click the hyperlink title text next to the icon. To quickly search for a specific learning event, you can also use SEARCH-and-LEARN.
Certification View
SkillSoft's IT skills and business skills library offer content mappings to the professional certification programs of a number of vendors, including Microsoft, Cisco, and CompTIA.
The Certification View allows you to see SkillSoft's content organized by vendor certification and by vendor exam. You can use it to easily pinpoint the available content that will help you prepare for certification. The Certification View also offers brief summaries of the required and elective portions of each certification within the Catalog, enabling you to determine where to most appropriately direct your efforts.
Use Shortcuts to link to areas in SkillPort that you use most often. Shortcuts can be one-click links to other areas within SkillPort or to completely different web sites. Shortcuts appear in the left-hand column of the SkillPort interface.
Use SEARCH-and-LEARN™ to quickly find information on a specific subject using keyword searches. You can search for all the different learning event types available on SkillPort, including courses, individual topics, simulations, books, SkillBriefs, and Job Aids.

Search SkillPort
1. In the SEARCH-and-LEARN panel, type a keyword or phrase in the Search for field. See Search tips for different ways of entering keywords.
2. Select a learning event category from the Category drop-down list. Alternatively, you can search all content categories.
3. If content in more than one language is available to you, choose a language from the Language drop-down list.
4. Click Search.
The search results appear below the SEARCH-and-LEARN panel. If you searched for all categories, the results will be grouped by category. The results will be ordered according to relevance, as indicated by a thermometer icon .
.
Refining your search
You can refine your search by
-
Clicking a learning event title to display a summary page for that event.
-
Clicking the View more ... link to display more search results for a particular category.
-
Searching within the returned search results. After performing an initial search, type a key word in the Search these results for field. This will return a list of learning events containing your key word from within the previously returned search results.
Do a related search
1. After doing an initial search in SEARCH-and-LEARN, click a learning event title in the search results.
2. The learning event summary page appears in the main pane on the right and the other search results are shown as a list on the left.
3. Click the Related Search button to display a list of learning events that relate to the event you have selected.
For example, if you do a search on the word "programming", SEARCH-and-LEARN will likely return a list of events relating to a number of different programming languages. If you select one of those learning events, say a course on Java, and then do a related search, only learning events about Java will be returned.
Note: Once you have performed a related search, the Related Search button will not reappear until you have opened the summary page of another learning event.
My Plan contains learning events that are part of your formal learning path. You, your training administrator, or your manager can add learning events to your My Plan and assign them a goal and a completion date.
Goals and E-mail Reminders
Learning events in your development plan can have an associated goal, due date, and frequency of e-mail reminder.
Due date
Defines when you must complete the learning event. If your manager assigns a learning event to you, you cannot modify the due date. The  icon indicates that the due date is approaching. The
  icon indicates that the Due date is over due.
Note: The Due date approaching and Due date over due icons only appear in the My Plan view when Compliance is enabled. Compliance is an optional feature and may not be enabled on your system.
Goal
A simple text description of why you are taking the learning event. If your manager assigns a learning event to you, you cannot modify the goal.
Reminder
Reminders are designed to prompt you periodically to complete a learning event. SkillPort supports several frequencies of e-mail reminders including: Daily, Weekly, Monthly, and a One Time reminder. You can also specify how many days before the due date you would like to start receiving reminder e-mails. The reminder e-mail contains direct links to the learning event as well as the learning event summary page. Once a learning event is complete, you can no longer set a reminder.
Adding learning events to My Plan
1. Find a learning event by browsing the Catalog or by specifying a word or phrase using SEARCH-and-LEARN.
2. Select the name of the learning event that you want to add to your plan.
3. In the learning event summary page, select Add this Course to My Plan. You will be presented with a Details dialog that permits you to enter Due Date, Goal, and Reminder information.
4. Select the Submit button.
The learning event is now listed under My Plan.
Adding folders to My Plan
You can add folders to My Plan in which you can store related learning events.
1. In My Plan, select the Add New Folder to My Plan button.
2. In the Add to My Plan page, type a name in the Folder field.
3. Enter a goal and select a due date for the folder.
4. Select the appropriate e-mail reminder option.
5. Select the Submit button.
The new folder should now be listed under My Plan.
Add learning events to a folder
1. Find the summary page for the learning event, either by browsing the Catalog or by using SEARCH-and-LEARN.
2. Select Add to My Plan.
3. In the Select Folder page, select the Select this Folder link next to the name of the folder.
4. Enter the goal, due date, and e-mail reminder.
5. Select Submit.
My Favorites is an area where you can store links to certain types of learning events for quick access. It supports  SkillBriefs,
  Job Aids, Books, and
  ExecSummaries- learning events that are considered part of your informal learning and do not have scores tracked by SkillPort.
You can click the  button to launch the learning event directly, or click the title of the event to view its summary page.
Adding an item to My Favorites
1. Select a learning event by going to the Catalog tab or by specifying a word or phrase using SEARCH-and-LEARN.
2. Select the learning event you wish to add to your favorites by selecting the underlined name of the event.
3. Select Add to My Favorites.
4. Select the Close this Window button.
5. Select the Home page tab.
The learning event now appears under My Favorites.
My Report displays a record of all your learning event activity. Your Learner Records Progress Report indicates the current status of learning events that you have completed or started. A summary of My Report is shown on the Home page. From the SkillPort Home page, select the Take me to summary view of report ... button or the My Report shortcut to access your Learner Records Progress Report.
Date Range Filters
Once you have accessed My Report, use the Date range to report on filter to search for courses within a specific time frame. To view all details of your Learner Records Progress Report, leave the No date range to include in report radio button selected and scroll down to view your progress report.
For large reports, select the Show results between radio button to enter a date range that will allow you to filter and display only courses that were started, last accessed or completed within a specified time frame. Once you have entered a date range and sorting order, select the Submit button.
Completed Courses
The Completed view provides details on individual learning events you have finished that have satisfied the Course Completion Criteria. Completed learning events can be re-accessed by selecting a course title link from the Course Title column or by selecting the GO button from the controls column. Completed Learning events can be sorted by selecting either the Course Title or Course ID column headers. Select the Print-friendly version link to view a list of your completed learning events in a separate, print-friendly window.
Report Field |
Description |
Course Title |
The title of a completed learning event. Selecting the course title hyper-link will take you to the course information page. |
Course ID |
The alpha-numeric identifier for a completed learning event. |
Started |
The date the learning event was first accessed. |
Completed |
The date the learning event was completed. |
Current Score |
The most current score you have achieved in the learning event. |
Course Completions |
The total number of learning events you have completed. Learning events are considered started until they have satisfied the course completion criteria. |
Started Courses
The Started view provides details on your progress with individual learning events. Started learning events can be re-accessed by selecting a course title link from the Course Title column or by selecting the  button from the controls column. Started learning events can be sorted by selecting either the Course Title or Course ID column headers.
Report Field |
Description |
Course Title |
The title of a started learning event. Selecting the course title hyper-link will take you to the course information page. |
Course ID |
The alpha-numeric identifier for a started learning event. |
Started |
The date the learning event was first accessed. |
Last Access |
The date the learning event was last accessed. |
Current Score |
The most current score you have achieved in the learning event. |
Courses Started |
The total number of learning events you have started. Learning events are not considered completed and removed from the started courses list until they have satisfied the course completion criteria. |
Controls
Learning Programs
The Learning Programs view summarizes your training performance on a designated series of courses assigned to you by your company or organization. Learning Programs can be sorted by selecting either the Learning Programs or Learning Programs Id column headers. After completing all courses within a Learning Program you can generate a Completion Certificate .
.
Note: The option to generate a Completion Certificate for a Learning Program is an optional feature and may not be enabled on your system.
Report Field |
Description |
Learning Programs |
The name of the Learning Program assigned to you. You may see this title in My Plan and in the Course Catalog. If you select the hyperlink, you are taken to the Learning Program Information screen. |
Started |
The date and time you first accessed content in a Learning Program |
Last Access |
The date and time you last accessed content in a Learning Program |
Completed |
The date that all components in the Learning Program were completed. |
% Completed |
This is the percentage of the Learning Program you have completed. This is determined by dividing the number of completed courses by the total number of courses in the Learning Program. Learning Events that do not track progress (e.g. a lone document, a URL, etc.) are not counted in this calculation. |
Completion certificates
When you complete a learning event, such as a course, simulation or Learning Program you can print a certificate of completion for that event.
To print a completion certificate:
-
Access the My Report page.
-
Select the View Certificate control button next to the name of the completed learning event. The Certificate will open in a new window.
-
Select File | Print.
Note: Completion certificates are an optional feature and may not be enabled on your system.
The Company News scrolling list displays links to various topics relating to company news and learning events. If there are no Company News items, "No news today" is displayed. Some of the topics listed in the Company News list may have hyperlinks. To get further information, select one of the topic links listed in the Company News list box.
Learning Programs consist of a series of courses assigned to you by your
company or organization. The goal of the Learning Program is to track your
training performance on a designated series of courses.
-
You complete a Learning Program by finishing every course listed in the curriculum.
-
You can add a Learning Program to your My Plan
-
You can add a Learning Program to My Enrollments
-
You can view your progress for a Learning Program in My Report.
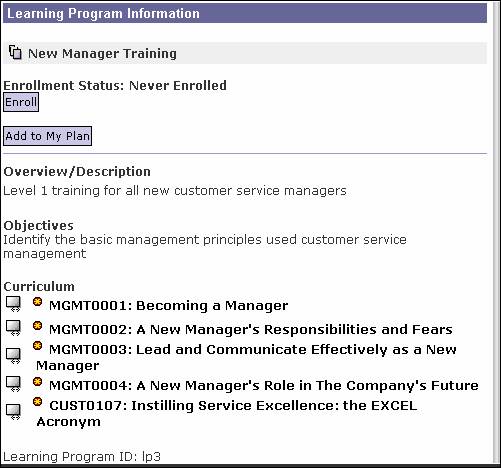
Learning Program Information Page
The Learning Program Information page provides an Overview/Description of the
program, the curriculum, expected duration, and the objectives of the program.
The Learning Program Summary page can be accessed from the Catalog, or
from My Plan, if it has been added to your My Plan.
Segment |
Description |
Overview/Description |
A high-level summary of the purpose of the Learning
Program. |
Objectives |
A list of the specific goals for the Learning Program. |
Start Date |
The date you can start taking courses within the
Learning Program. If you start accessing Learning events prior to the start date, any progress you make is not counted towards completing the
Learning Program. This is an optional feature of Learning Programs. |
End Date |
The date by which you must complete all Learning
events in the Learning Program. If you do not finish all the events by the stated date, you will not earn credit for completing the
Learning Program. This is an optional feature of Learning Programs. |
Curriculum |
A list of the Learning events included in the Learning
Program. If you have launched a Learning event, you will also see your progress listed next to the title:
- Accessed - Learning events that do not track progress are considered accessed once you have opened and reviewed the content.
- Started - Learning events that track progress are considered started once you open the course
- Completed - Learning events that track progress are considered completed when you have finished the course (based on the current completion criteria)
|
My Enrollments
My Enrollments contains items that are part of your Learning Program. You and the administrator can add
Learning Programs to your My Enrollments.

The My Enrollments page contains the tools and status sections. The forced enrollment icon indicates that the Admin has forced enrollment on the user.
 My Enrollments - Students can view this tool.
- Status of the Learning Program - My Enrollments maintains and displays the
status of the Learning Programs. The information on the My Enrollments page
includes historical information. My Enrollments maintains the following
categories:
- Learning Event Title - Lists the Learning events
- Created Date - Displays the Learning Program was created.
- Updated - Displays the last date the Learning Program was modified.
- Actions - Click one of the following icons:
 Withdraw - Withdraws from the Learning
Program.
Withdraw - Withdraws from the Learning
Program.
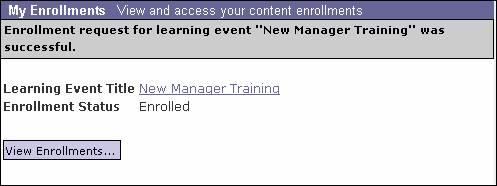
Enrolling into Learning Program
To enroll in a
Learning Program:
1.
Find a Learning
Program by browsing the Catalog.
2.
Search through the
catalog and the Learning Programs and select the name of the Learning Program in
which you wish to enroll.
- In
the Learning Program Information page, click the
 button
Withdrawing from a Learning Program
To remove a Learning Program from My Enrollments:
1. Click the  icon of the Learning Program you want to remove. SkillPort asks if you want to withdraw from the
Learning Program.
icon of the Learning Program you want to remove. SkillPort asks if you want to withdraw from the
Learning Program.
Note: You cannot
withdraw from a Learning Program that was assigned to you by an Administrator.
2. Click the  button with withdraw from the selected
Learning Program. The browser refreshes and displays the successful withdraw message.
button with withdraw from the selected
Learning Program. The browser refreshes and displays the successful withdraw message.
3. Click the  button to return to the My Enrollments page.
Note: Withdrawing from an enrollment does not remove it from the My Enrollments view. It moves it to the withdrawn category. SkillPort no longer considers the student enrolled in the
Learning Program and does not allow the student to access the content within the
Learning Program summary page. You cannot remove the data from the My Enrollments view.
The Credentialing system on SkillPort allows you to earn education credits by completing SkillSoft training. Each Credential has a unique catalog that displays all the courses that you can receive credit for. To access the Credentialing Page, select Credentialing from the Shortcuts menu.
Credentialing Page
The Credentialing Page displays all of the Credentials offered by your organization. For each Credential, the Credentialing page contains a link to a Credential course catalog and Credential report.
Credentialing Catalog
Select the corresponding Catalog link to view all the courses that you can receive credit for in that Credential. In the Credential catalog, select a course link to display the summary page for that course. From the summary page, you can play the course, download the course to your local machine, or add it to your My Plan.

Note: Once you begin a course in a Credential, you must complete that course within a year or you cannot receive credit for that course.
Credentialing Report
To launch the Credentialing Report, select the Report link for a specific Credential in the Credentialing page. The Credential report lists the specific requirements for a selected Credential. These requirements can include any combination (or all) of the following:
-
The overall high score is % or better.
-
Every page of every topic has been viewed.
-
The course evaluation has been completed.
The Credentialing report also shows your scores for the courses that you have either completed or started. You can also access course evaluations and print completion certificates.
Note: If you are taking a NASBA course, you must complete the evaluation in the Credentialing report. If you complete the evaluation in the SkillSoft Course and do not complete the evaluation in the Credentialing report, you will not receive NASBA credit.
Course Evaluations
Depending on the Credential's requirements, you may have to complete a course evaluation in order to earn credit for a course. To access the course evaluation after you complete and pass an applicable course, open the Credentialing Page, launch the Credentialing report, and select the applicable In order to achieve credit please complete credential evaluation link in the Credentialing report.
View/Print a Credentialing Certificate
To View/Print a Credentialing certificate that you have already earned, launch the Credentialing Report and click on the applicable View Certificate link. You can print the certificate using the print button.
Customizing SkillPort
You can customize the following aspects of SkillPort:
Update your User Profile
This option lets you update your User Profile which includes your name, email, and password information.
Configure Language Settings
This allows you to choose the language in which the SkillPort site appears. You can also choose a language preference for search results that will override your company's default language for the site.
Select Business Skills Player Skin
This option lets you customize the appearance of the Business Skills Player by selecting a skin. A skin changes the appearance of the Business Skills Player by presenting different colors, fonts, and graphics. Skins downloaded via the SkillSoft Course Manager are not altered by selection; these courses will need to be downloaded again.
Note: Skins may not be an available option on your SkillPort.
Once you have located a course, select the underlined course or topic title to view the course summary page. The course summary page provides an Overview/Description of the course, intended target audience, expected duration, and the objectives of each lesson in the course.
The buttons that appear on the course summary page allow you to take several actions:

Select this button to take a course live over the web. This will immediately launch the course in a separate browser window.

Select this button to add a course to your My Plan.

Select this button to download a course to your PC. Downloading the course will allow you to access it while offline. The first time you choose this link, you will be prompted to install the SkillSoft Course Manager (SCM) to manage your offline course content. After the SCM is installed, selecting this link will launch the SCM and enable you to download content.

Select this button to display a list of related Job Aids and SkillBriefs.

Select this button to access the online evaluation form associated with this course. An evaluation has to be created and assigned to the course(s) in order for the link to appear.
A SkillSoft Course is web-based instructional content delivered to you on your computer. During the course you practice and are assessed on your mastery of skills and knowledge learned in the course. Instructional content includes business skills and information technology courses. The following course types are available on SkillPort: Business Skills courses, IT courses, and Classic courses.
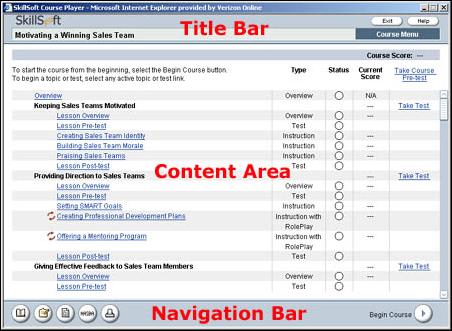
When you first launch a course the Course Menu opens in the content area of the SkillSoft Course Player.
The SkillSoft Course Player is divided into three areas:
-
Title Bar
-
Content Area
-
Navigation Bar
Note: When you launch a course, if you choose not to run the signed player applet the following message will be displayed: By not accepting to trust the SkillSoft player applet, the course will not be launched. When you close the message box, the Player will exit.
Note: You may notice slight variations of the player depending on the specific course you play. If you notice a subtle difference in the display, your interaction with the user interface remains the same.
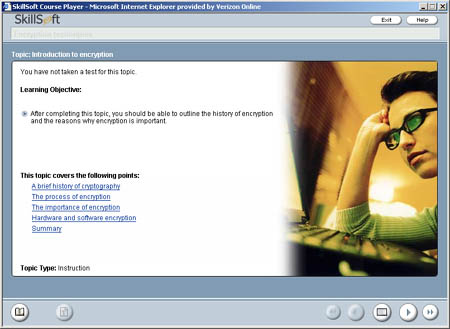
Title Bar
The Title Bar is located at the top of the screen. It contains the course, lesson, or topic title, the Help button , and the Exit button
 .
.
Note: DO NOT use the  close window button in the top right corner of the browser window or other Windows control functions to exit the course. Scores and bookmarks may be lost if you do not use the Player's Exit button.
Content Area
The Content Area can display topic pages, test questions, or the course menu. While displaying the Course Menu, the top of the Content Area displays the course goal, current course score, and a link to the Course Test. The main part of the Content Area displays the course menu including links to the lessons and topics, links to the tests, and topic status and scores.
While displaying a course content page or test page, the Content Area displays the content type of the course or test.
While displaying a test introduction or summary page, the top of the Content Area displays your name and your course score. The main part of the Content Area displays the content titles and scores. In some cases links are displayed so you can play content or retake the test.
Navigation Bar
The Navigation Bar contains several buttons that enable access to course resources and allows you to navigate sequentially through the course content pages. When instructional content or tests display in the Content Area, the SkillSoft Course Player displays course navigation buttons, audio controls, and the topic status window in the Navigation Bar.
It is important to note that there may be variations in the Navigation Bar depending on the content type you are playing. For example, SCORM and AICC courses may have embedded navigation controls. Dialogue Recorded Sessions have additional controls to pause and navigate within a recording.
The SkillSoft Course Player displays the Print Scores button in the Navigation Bar for Test Transition/Summary pages and the Course Menu.
Tip: You can verify the SCP version by pressing and holding <CTRL> and double-clicking the Navigation Bar.
When you first launch a course or select the Course Menu button while viewing course content, the Course Menu opens in the content area of the SkillSoft Course Player.
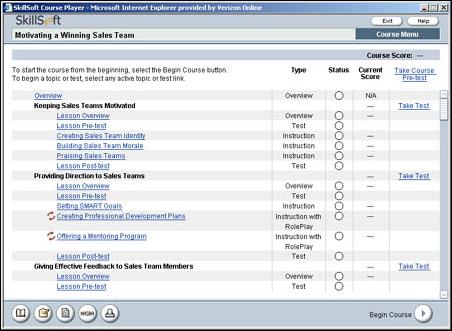
The left side of the course menu displays the hierarchy of the course down to the topic level. It contains links that allow you to go directly to a particular topic. The right side of the course menu provides information about each course component or allows you to take a specific test.
Course Hierarchy
Courses follow a general organizational structure:
- Overview - Launches the overview for the course.
Note: Some courses were intentionally designed without course overviews.
- Lessons - Lessons are containers for related topics. Lesson titles are displayed in bold text on the course menu.
- Topics - Topics contain the content in SkillSoft courses. Topic titles act as links to the specific content.
Note: If you downloaded individual topics from a course using the SkillSoft Course Manager (instead of downloading the entire course), some of the links in the course menu may not be available to you.
Hierarchy for Dialogue Design Courses
Dialogue Design courses have a slightly different course hierarchy, which is as follows:
-
Course - Dialogue Design does not have the concept of a lesson and the entire course is treated as a single lesson.
-
Segments - Segments are similar to topics in other courses. A Dialogue Design course can contain one or more segments.
-
Slide - Slides are similar to learning points in other courses. In Dialogue Design courses a learning point is limited to a single page.
Menu Information
- Goal - Displays a general description of the high-level goals of the course. Goals may not be displayed for all courses.
- Course Score - Displays your current score for the course. This score is an average of the current score on all tests in the course. All tests that you have not attempted display as "---" and are scored as 0% until you take them.
- Type - This column describes the topic type.
- Status - This column indicates your progress navigating through each topic. A not started icon
 displays if you have not opened any of the pages in the topic. A started icon
  indicates that you have opened at least one page in the topic. A completed icon
  indicates that you have opened and navigated through all pages in the topic.
- Current Score - This column displays your current score for each lesson or topic. N/A means the content associated with that entry is not tested anywhere in the course.
- Take Course Test/Pre-test - This is both an active link, as well as a column heading. The entries in this column launch the test for the entire course, an entire lesson, or a single topic within a lesson. The testing options may vary depending on the course.
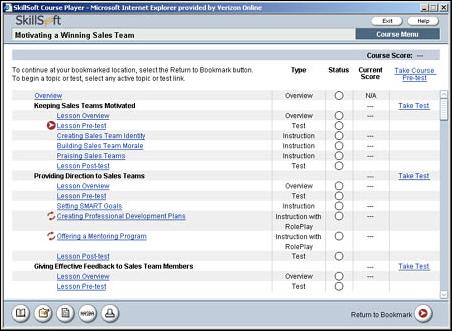
 Bookmark - Indicates the last topic you were viewing when you closed the course or selected the Course Menu button.
The Navigation Bar appears at the bottom of the SkillSoft Course Player. It has the following buttons. When instructional content is played, navigation controls are also available in the content area.
 Resources/References Resources/References
Select to launch the References or Resources page in a separate window. This page contains links to course reference information including Course Objectives, Glossary, Job Aids, Follow-on Activities, Additional Resources, Copyrights, SkillSoft Licensing Agreement, About this Course, and Approximate Duration. |
 Job Aids Job Aids
Select to launch the Job Aids page in a separate window. This page contains links to all the Job Aids for the course.
Note: The JobAids button is not available for Dialogue Design courses. |
 SkillBriefs SkillBriefs
Select to launch the SkillBriefs page in a separate window. This page contains links to all of the SkillBriefs for the course.
Note: The SkillBriefs button is not available for Dialogue Design courses. |
 NASBA NASBA
Select to launch the NASBA CPE page in a separate window. This page contains information on receiving NASBA CPE credit for the course and a link to the NASBA course evaluation form. This button is only available for NASBA certified courses. |
 Slide Captions Slide Captions
Select to view the slide notes (captions) in a separate window.
Note: This button is available only for Dialogue Design courses. |
 Print Scores Print Scores
Select to display a printer-friendly version of your scores. This button is only available on the Course Menu and test transition/summary pages. |
 Learning Points Button Learning Points Button
Select to display the Learning Points dialog box. Use the Learning Points dialog box to view and navigate to the learning points in the selected topic.
Note: This button is replaced in Dialogue Design courses by the Slides List button. Clicking on the Slides List button will bring up the Slide List dialog box from which you can navigate to the other slides in the segment. |
 Transcript Button Transcript Button
Select to launch the Transcript page in a separate window. This page displays a transcript of the course. |
 Ask My Mentor Button Ask My Mentor Button
Select to launch the Ask My Mentor page in a separate window. This page allows you to receive individual attention from vendor-certified professionals through email, online chats, and threaded discussion groups. |
 Begin Course Begin Course
When viewing the Course Menu, the Begin Course button is displayed on the right side of the Navigation Bar. You can use this button to navigate to the first page of the course.
Note: If you have previously entered a topic in this course, this button displays as Return to Bookmark and you use this button to enter the last page you were viewing when you exited the instructional content. |
 Return to Bookmark Return to Bookmark
When returning to the Course Menu of a topic you entered previously, the Return to Bookmark button displays on the right side of the Navigation Bar. You can use this button to enter the last page you were viewing when you exited the instructional content. Depending on the course type, the button can display as  or . or .
Note: If you have not previously displayed any course content in the open course, this button displays as Begin Course and you can use this button to navigate to the first page of the course. |
The SkillSoft Course Player tests your knowledge of the course learning objectives at the course, lesson, or topic level.
The Player provides optional pre-tests and post-tests to assess your knowledge before and after you go through the instructional content.
Note: Depending on how the SkillSoft Course Player is configured by your organization or the specific course type, some of these pre-test and post-test options may not be available to you.
Tests can be taken at any time. However, when the Player is configured with the pre-test and/or post-test options, the tests display sequentially in the content either before the lesson is started (for a pre-test) or at the end of last topic in a lesson (for a post-test). This is useful for learners who like to start at the beginning of a course and continue through to the end of the course, in order, without having to go back to the Course Menu to make test selections. Tests also remain accessible from the Course Menu.
Whether you select a test link from the Course Menu, or you navigate through the instructional content, you'll always encounter a Test Transition/Summary page from which you'll launch the actual course test.
Select the Begin Test button to start the test.
After you start a test, the SkillSoft Course Player presents a series of questions. You can choose to answer the question when it is displayed or you can choose to answer the question later.
To answer a question, check the appropriate answer(s) (for multiple choice type questions) or drag and drop the appropriate answers (in matching questions).
Answer Later
If necessary, you can mark questions for answering later. Do one of the following to mark questions for later review:
-
In a Business Skills (e3) course, click the Answer Later button .
.
-
In an IT Skills course, click the Mark for Review button .
.
When you are ready to answer the question, you must open the status screen and select the link for that question. Access the status screen by selecting the Status button during the test or by selecting the Return to Status button
  in the dialog box that displays when you finish the test. The icon
  displays next to the question in the status page. You can then click the question for review. If you skip a question and end the test without answering it, you receive a score of 0% for that question.
Status Page
The status page indicates the progress that you have made in a course or topic test and is accessed by selecting the Status buttonduring the test. Questions that were skipped display the answer later icon. The status screen has links to each test question allowing you to answer skipped questions and review questions that you already answered.
To exit the Status screen and return to the test, click the Close Status button .
.
Skipping a Test
Depending on the specific course design, you may be given the option to skip a test. If you select , you proceed directly to the next lesson or topic. You can use the course menu to return to the test at a later time.
Ending a Test
Upon completion of a test, the Test Summary screen displays. You can review any topic covered in the test by selecting the appropriate link. You can retake the entire test or a topic test by selecting the applicable Retake Test link. If you are finished with the test, you can return to the Course Menu page by selecting the Course Menu button.
Note: The ability to retake a test can vary depending on the course.
Whenever you launch a test, a Test Transition/Summary page opens. This page contains the test scores for the course or applicable lesson. The topic titles are not selectable. The Summary page also displays the Print Scores button which allows you to print out your test scores. Depending on the course design, you can press the Skip Test button to continue the course and return to the test at a later time.
Test Scores
The Test Summary page contains your scores for the test. The scores are broken down by topic. Each question in the test is related to a lesson topic. The topics scores are the total of all the applicable questions for that topic in the test.
A value of "--" in the score column indicates that you have not yet taken that test. A zero in the score column indicates that you took the test but did not answer any questions correctly. The scores are divided into three columns:
- Pre-test score - Displays the score for your course or lesson pretest. You can only take a pre-test once. If pre-tests are not enabled, the name of this column changes to First Score and displays the score for the first time that you took this test.
- Highest Score - Displays the average of the highest scores you received for each individual objective.
- Current Score - Displays the score for the last time that you took this test.
- Course Score - Displays the current average score for all test items in the course, based on the tests you have completed. All the tests that you have not attempted are scored as 0% until you take them.
Note: The First (Pre-test), Highest, and Current lesson scores are all recorded and sent to the Learning Management System for use by your organization. The Course Score is provided for your information only.
Test Summary
When you finish a test, the Test Transition/Summary page is displayed and shows your updated scores for the test you just completed. The topic titles become selectable so that you can review a topic. You can also retake the test unless it was a pretest (you can only take a pretest once).
You may also have the option of retaking the questions in the test for a specific topic by selecting the Retake Test link next to the applicable topic. When you retake questions for one topic, you are scored for your new attempt along with the score you got for the other topics in your last attempt.
There are several options available to you when taking tests. You can choose to take a full course test or to take segments of the test by lesson or topic. If you decide to take topic or lesson tests, your results contribute towards the completion of the course test. You can choose to answer questions later and review your progress on the Test Status page.
In the example shown below, you can see that portions of each topic test have been completed and their resulting contribution to the Course Score.
Course-Level Testing Options
Course Pre-test
The course pre-test assesses your knowledge of the learning objectives that are covered in the course before you play the instructional content. To launch the course pre-test, select the Take Course Pre-test link in the Course Menu.
Note: Once you complete any other test, the link changes to Take Course Test and the course pre-test option is no longer available.
Course Post-test
The course post-test assesses your knowledge of the learning objectives that were presented to you in the course. To launch the course post-test, select the Take Course Test link in the Course Menu.
Note: Tests can be taken at anytime. Even if your SkillSoft Course Player is not configured to insert Pre-tests and Post-tests sequentially in the content, you can still select a test anytime from the Course Menu.
Lesson-level Testing Options
There are three lesson-level testing options: pre-test, post-test, and topic-level testing. Depending on the design of the course, you may see any variation of these tests.
Lesson Pre-test
The lesson pre-test assesses your knowledge of the learning objectives that are covered in the lesson before you play the instructional content of a lesson.
There are three ways to launch the lesson pre-test:
- Select the Lesson Pre-test link for the appropriate lesson in the Course Menu.
- Select the Take Test link in the appropriate lesson section of the Course Menu.
- If you play the course content sequentially, you will encounter a Lesson Pre-Test after you have finished the Lesson Overview.
Note: Once you complete any other test in a lesson, the lesson pre-test option is no longer available for that lesson.
Lesson post-test
The lesson post-test assesses your knowledge of the learning objectives that were presented to you in each lesson.
There are three ways to launch the lesson post-test:
- Select the Lesson Post-test link from the appropriate lesson in the Course Menu.
- Select the Take Test link for the appropriate lesson in the course menu.
- If you take the course sequentially, the Player launches each lesson post-test (if enabled) after you navigate through all the content associated with the lesson.
Topic-Level Tests
The topic test assesses your knowledge of the learning objectives that were presented to you in each topic. As you complete each topic test, the results contribute towards the completion of the course test. You can take a topic test at any time, regardless of whether or not you have reviewed the course content for that topic.
To launch the topic test, select the appropriate Take Test link for that topic in the Course Menu.
Note: Topic tests may not be available in all courses. If topic tests are not an option in the course you are taking, this is by design.
Your Overall Course Score is the average of the current test scores for each lesson. Lesson tests that you have not taken are scored as zero until you complete the test. To take the Lesson tests all at once, click the Take Course Test link in the Course Menu.
Partial Credit Scoring
If partial credit scoring is enabled, you can earn some credit for answering a portion of a question correctly. For every matching question or question that has multiple correct answers, you receive a percentage of what that question is worth for every correct answer you select. You lose a percentage of that question's value for every incorrect answer you select.
If partial credit scoring is not enabled, you must choose all correct answers or match all choices correctly to receive credit for that question.
Example: A course with three lessons has three lesson tests. Your overall score at any given time is the average of the current test results recorded for all three tests. If you score 85 on the 1st test, 95 on the 2nd test, but have not yet taken the 3rd test, your Overall Score is 60% (85 + 95 + 0)/3.
Other scoring models
Some courses provide tests for each topic. Your total score is determined by either the score that you receive from the course test or by the average of the topic scores out of a possible 100%. Each topic score equals 0% until you take it.
Example: If a course has 5 topics the course score is the average of the 5 topic scores. If you score a 100% on the first three topic tests, 50% on the fourth topic test, and 0% on the fifth, you would receive a course score of 70% (100 + 100 + 100 + 50 + 0)/5.
The criteria to complete a course can vary depending on the configuration of your Learning Management System (LMS). Course completion may be based on:
-
playing all the pages in the course
-
answering all test questions correctly
-
answering a certain percentage of the test questions correctly
-
A combination of page play in conjunction with correct test answers.
The course completion criteria may be available from your LMS system, e.g. on your progress report. Contact your training administrator if you need help determining the criteria.
You launch a course from your Learning Management System. The following features and navigation items are found in all courses.
When you launch a course, the course map is displayed to the left of the screen. The course map is arranged by units. You can choose to start the course at the beginning, or at any of the units.
The course map displays the structure of a course. Each course is divided into units. Each unit is made up of topics. Topics are divided into a series of screens.
When you first start a course, the course map is displayed. From the course map, you can choose to run the course from the beginning, or jump into the course at any unit, topic, or screen of your choice.
-
Select the unit title to view the topics within the unit.
-
Double click the topic title to start the topic at the beginning screen for that topic.
-
Double click a screen number to start the topic at that screen.
Course Map Control Panel Buttons
Along the bottom of the course map, are control panel buttons.

The  button returns you to the beginning of the topic last visited. This applies even if you have exited and reentered the course. This button is only available if you have accessed at least one unit.
The  button displays your progress through course units and any test scores.
The  button starts a selected topic or screen number.
The  button launches your web browser and provides access to the Course Resources web page, which contains all the web links belonging to the course. Web links are provided to supplement and complement the course, as well as to enhance your learning experience. They are not intended to fulfill course objectives.
The  button exits the course after a confirmation screen.
The  button displays the Course Help System.
Course Navigation Features
Once you enter a topic, the Smart Controls are displayed by default in the right-hand side of the screen – either fixed or as a floating control palette. The control palette can be maximized by using the maximize/minimize button. You can return to the course map from any point in the course by selecting on the Navigate button.

The  buttons enable you to navigate through a course.
The  button takes you to the course map screen.
The  button displays a Web links dialog box with a link to the Course Resources page on the Internet. Selecting the link will launch your browser and bring you to the page.
The button allows you to launch a text editor, copy the on-screen text to a text editor, or copy the text of the entire topic to a text editor. Once you have copied the text, open the application you want to paste it to and save as normal.
The  button displays extra information relevant to the point being discussed in the course. When a footnote is available, a small yellow icon appears to the right of the text. Select the icon or Footnote button to access the information.
The <Audio> button allows you to take an audio-enabled course in one of three different ways – text and audio, text only, or audio only.
Thebutton displays the Course Help System.
Thebutton exits the course after a confirmation screen.
The  button maximizes or minimizes the Smart Control palette.
There are a variety of features in the courses ranging from Notes and Web Links to Lab Exercises and Simulations. Not all courses contain all the features listed.
Unit Aim and Objectives
This screen displays the unit aim and learning objectives for the unit.
Notes
Notes appear on screen in a note box separate from the regular text. Notes are used to include additional, useful, interesting, or aside information about the text immediately preceding them. They are also used to refer to relevant sources of information—other SmartCourses, manuals, online Help, and so on.
Footnotes
Footnotes are used for nonessential information relevant to the text being discussed. Sometimes they are used when the information that would normally be included in a note is too long. They are indicated on screen by the icon appearing at the end of a paragraph. The icon stays enabled as long as the information in the footnote is relevant. Selecting the icon displays the footnote on screen.
Web links
Web links are used to access helpful information on the Internet from within a course – these types of web links are referred to as embedded web links. An embedded web link has specific relevance to the information under discussion and is inserted in the course text itself.
Demonstrations
You are guided through a demonstration of tasks that apply the concepts to practical situations. In the case of a software application, this is illustrated by a screenshot, with the relevant feature clearly indicated. This improves your understanding of how to use a given tool in a real-world environment.
Course Questions
Course questions (or "discovery" questions) encourage you to think about the material and anticipate the correct answer. Unlike the course or unit tests, no record is kept of your answers to questions in the course, and you are only scored on your performance when you choose to take a test.
There are nine different types of course question, such as true/false, yes/no, and multiple-choice.
Unit Summary
Each unit ends with a unit summary screen. When you enter the unit summary screen, a brief account of what you have covered in the unit displays. If you want to view the full summary for the unit, select the Summary button.
Exercises
Exercises offer a thorough interactive practice session appropriate to the learning points covered previously in the course.
Both lab exercises and coding exercises are indicated in the list of topics in the course map by a pointing-hand symbol.
A Lab exercise offers you an opportunity to work in a simulated version of an application.
A Coding exercise gives you an opportunity to analyze and write code or commands. This type of exercise uses a simulated version of a realistic programming environment. This allows you to become actively involved in building one or more coding statements on screen by answering special coding questions throughout the exercise. Appropriate feedback is always given after each question. In all coding questions you can choose to access a question hint by selecting the Hint button.
A Simulation allows you to practice using the application. They differ from other exercises because they are integrated into the course text rather than appearing in a separate dialog box.
A DecisionPath exercise simulates the process of making complex decisions. You are presented with a business problem and asked to come up with a solution by answering a series of questions. Each time you answer a question, your decision—and its consequences—is recorded in the log window. There is no single right or wrong answer, although one decision is generally better than the others. Every decision you make receives feedback. In addition, if you wander too far in the wrong direction—that is, continue to make bad choices—you receive feedback prompting you to move back in the right direction.
Test results provide important information on whether you have successfully assimilated the course content and learned the intended skills. You can take a test at either a unit or a course level. You can choose to take a test on a piece of learning content at any point before, during, or after launching the content.
You can see your score by selecting the Status button in the test question box.
Note that no Cancel button is available in test questions. This means that you must attempt every test question. You can, however, choose to exit the test at any point. If you do opt to exit, you will abandon the test completely and you will have to start from the beginning the next time you take the test.
Unit tests are designed to assess your knowledge of a particular unit. Depending on your performance in the unit test, you may or may not want to complete the actual unit. Your score displays when you finish the test.
The Course Test covers material on the entire course. This test can serve as a pretest when taken before going through the course, or taken after you have gone through the course to assess your knowledge. The Course test questions are randomized from a bank of test questions.
FastTrack assessment creates a personalized learning path tailored to your particular needs. When you have mastered the questions for a unit, a check mark appears beside that unit title in the course map. If you are unsuccessful in questions for a unit, an X will appear beside the unit. A dash appears beside the unit when no test has been taken.
A SkillSoft Simulation (SkillSim) is a technology-enabled simulation which puts you in an authentic business or professional situation.
You will play a major role in a variety of simulated interactions where your decisions will have a direct impact on the course of events and result in realistic consequences. The SkillSim is designed to help you practice or assess your mastery of skills and knowledge learned in a series of SkillSoft courses. As you progress through a series of scenes, you will receive feedback on your performance. To assist you, the simulation incorporates links to context sensitive SkillSoft course material.
Simulations are started within a web browser. The way you enter into a simulation will depend on the specific setup of your company's on-line training environment. Regardless of the exact system, each simulation will start from a summary page that provides:
Select the Play link on the summary page to launch the simulation.
Simulations begin with an introduction page that allows you to either view the introductory material or begin the Sim.
Note: If you are taking this Sim for the first time, we recommend that you read through the introductory material. Make sure you read and become familiar with the introductory information. This will assist you in your performance during the simulation!
All simulations have an introduction page that provides overview information about the simulation. For example, the introduction page may include information about:
- The company you work for.
- The characters you will interact with.
- The resources that are available to you during the simulation.
The specific information available on each introduction page depends on the simulation content. You can review the information from the introductory page (along with other important pieces of information) after the simulation begins by selecting Reference Info from the Simulation Player Menu.
Note: Some older simulations do not allow you to skip the introductory material and go directly to the Sim. In the future, all Sims will have this functionality.
Explore Mode, Score Mode or Test Mode
When you enter a simulation, you are given the choice to take the simulation in either Explore mode or Score mode. Place the mouse over each button to get a brief description of each mode.
Explore Mode

Explore mode provides helpful feedback about the choices you make during the course of the simulation. Choice feedback appears when you roll your mouse on one of the available answer choices. You can also navigate back to previously viewed pages and select alternate choices to experience a variety of different outcomes. You will not receive any assessment scores for simulations taken in explore mode.
Score Mode

Score mode allows you to test your skills within the simulation. Unlike Explore mode, you will not receive any Choice Feedback about the choices you make until you complete a scene within the simulation. You are also restricted from returning to previously viewed pages. Your performance will be assessed against the simulations objectives (introduced in the simulation's summary page).
After you complete the simulation, your score is recorded in the learner management system database. Choices in the simulation are rated "Appropriate," "Fair," or "Inappropriate." The Simulation Player uses these ratings to determine your score.
-
You complete the simulation making all "Appropriate" choices. Your score is 100.
-
You complete the simulation and some of the choices are rated "Fair" or "Inappropriate." Your score is less than 100 but greater than 0.
-
You fail the simulation. Even though you may have made "Appropriate" choices, you selected an "Inappropriate" choice that terminated the simulation early. A Final Summary feedback page is displayed and you are not presented with the remaining material in the simulation. Your score is 0.
Test Mode

Test mode allows you to test your skills within the simulation. Test Mode is nearly identical to Score mode. However, in Test mode you do not have access to course materials in the simulation and Course Links are not available from the drop down menu. You will not receive any Choice Feedback about the choices you make until you complete a scene within the simulation. You are also restricted from returning to previously viewed pages.
The simulation's objectives will not appear in the simulation's summary pages. The simulation's objectives appear with the summary text which describes your performance at the end of each scenario.
After you complete the simulation, your score is recorded in the learner management system database. Choices in the simulation are rated "Appropriate," "Fair,” or "Inappropriate." The Simulation Player uses these ratings to determine your score.
Scoring Examples:
-
You complete the simulation making all "Appropriate" choices. Your score is 100.
-
You complete the simulation and some of the choices are rated "Fair" or "Inappropriate." Your score is less than 100 but greater than 0.
-
You fail the simulation. Even though you may have made "Appropriate" choices, you selected an "Inappropriate" choice that terminated the simulation early. A Final Summary feedback page is displayed and you are not presented with the remaining material in the simulation. Your score is 0.
There are several ways to advance through a simulation:
- Select specific choice text.
- Choose to use an active resource on the desktop or from the Simulation Player Menu.
- Select the previous button
 located near the top-right of the simulation interface. The button allows you to page back through the simulation screens.
Note: The previous button is unavailable throughout a simulation if you are in Score Mode. This prevents the student from scrolling back and re-answering questions they may have answered incorrectly. In Explore Mode, the previous button is inactive on the first page of a new scene. You can only return to a previously played scene by exiting the SkillSim Player and restarting from the beginning.
All the commands necessary to complete a simulation are available from the SimPlayer Menu.
Client, Phone, Course, Document, Computer |
Resources used throughout the simulation to aid you in making decisions. Sub-menus will appear if there are several choices available under each resource (e.g. there are several computer files for you to reference during the simulation). |
Reference Info |
Reference information is available throughout the course (it is always available on the menu). Reference information is background information or other pieces of data that you would always have available (e.g. information on the various characters that appear during the simulation). |
Audio On |
Toggle button that allows you to turn simulation audio on or off. |
Print |
Allows you to print simulation feedback. |
Exit |
Exits the simulation. |
Help |
Opens the web-based help utility for the Simulation Player. |
Several resources are made available to you during the course of the simulation. Resources that are available to you at a given point in the simulation are called active resources. They appear as selectable items in the interface (a picture of a phone, computer, folder files, etc.) or you can access them via the Simulation Player Menu. The availability of a particular resource is dependent on where you are in the simulation or on a specific event. There are five different resources available in simulations: Computer, Document, Client, Phone, and Course.
Note: Not all resources are available during a given simulation.
Computer |
Access to simulated e-mails and other computer files used during the course of the simulation. |
Document |
Access to various documents that support simulation content (e.g. a company policy memo). |
Client |
Represents interaction with characters throughout the simulation (i.e. clients, coworkers, managers, etc.). |
Phone |
Allows you to have telephone conversations with characters in the simulation. |
Course |
Links you to SkillSoft course content that addresses one of the instructional objectives of the simulation. |
Choice text options are available to you as you progress through the simulation. Usually, the response choices are either actions you can take or dialog to respond to another character. Once you have made your decision, select the choice text to continue the simulation. Depending on the situation, you may get a response from a character in the simulation through character dialog.

Choice Feedback is only available in Explore Mode. Choice Feedback appears as you roll your mouse over the various choices you have available during that point of the simulation. The Choice Feedback text box is color coded to help you identify if a choice is good, fair or inappropriate.

-
Feedback for an appropriate choice is displayed in a green text box.
-
Feedback for a fair choice is displayed in a blue text box.
-
Feedback for an inappropriate choice is displayed in a pink text box.
Events are timed actions that occur at a specific point in the simulation. You have no control over events; their occurrence is predetermined. You will be prompted to respond to an event through graphics and audio (e.g. the phone starts blinking or a message saying "You've got mail" appears on the computer screen), pop-up text, or a combination of the two.
Note: It is up to you to choose whether or not to respond to certain types of timed events. However, be aware that the choice you make may impact the final outcome of the simulation.
You will receive feedback for the choices you at the end of each scene on a Feedback Page, and at the end of the entire simulation on the Final Summary Feedback page. Each of the responses you made during the scene are rated as either Appropriate, Fair, or Inappropriate. A list of the objectives covered in the scene also appears at the bottom of the feedback page. You can print a copy of the feedback page by selecting Print from the Simulation Player Menu.
After each scene, you will receive feedback based on the selections you made during that portion of the simulation. The options you are presented with on the Feedback pages depend on the mode you selected when you first began the simulation.
Explore Mode Feedback
After completing a scene in Explore Mode, you are presented with four options on the Feedback Page:
-
Continue - Begins the next scene in the simulation
-
Retry Scene - Restarts the scene you just completed
-
Retry Simulation - Restarts the simulation at the very beginning. You will again be given the option of choosing between Explore and Score mode.
-
Exit - Exits the Simulation Player
The same options are available on the Final Summary Feedback page (however, the Continue option will not be available because the simulation has ended).
Score Mode Feedback
After completing a scene in Score Mode, you are presented with three options on the Feedback Page:
-
Continue - Begins the next scene in the simulation.
-
Retry Scene - Restarts the scene you just completed.
-
Exit - Exits the Simulation Player.
The same options are available on the Final Summary Feedback page (however, the Continue option will not be available because the simulation has ended).
You may exit a simulation at any point by selecting Exit from the Simulation Player Menu or from a Feedback Page. When you return to the simulation, you are given the option of continuing or restarting the simulation.
- Continuing a simulation will place you back at the beginning of the scene you were in when you originally exited the simulation, not on the exact page. Your previous scores will be retained.
- Restarting a simulation will place you back at the beginning of the simulation. Your scores will be reset.
A Test Prep Exam is a practice test that helps you prepare for a certification exam. You can take a test in Study Mode (where you receive feedback after each question) or in Certification Mode (designed to mimic a certification exam).
 Final Exams
A Final Exam is a test associated with a series of courses or learning path. Questions are drawn from all courses in the series to create an inclusive exam to test your knowledge of the subject matter. You demonstrate your competency with the associated courseware by successfully completing the Final Exam. In some cases, you must complete a Final Exam in order to earn college credits or to meet the requirements for professional-level certifications.
Mentoring provides a convenient way of accessing the Ask my Mentor feature for a particular course or certification path. They map to specific certification exams, and appear in the Catalog beneath corresponding exams within the Certification View.
You can access mentor support by selecting a link from the course summary page or from the Ask My Mentor button in the objectives screen of a mentored exercise. You are then taken to the Ask My Mentor page, where you have a choice of entering into a Chat or sending a question to your mentor via e-mail.
You may also be able to access Mentoring through special Mentoring assets which appear in the Certification View of the Catalog and in SEARCH-and-LEARN.
Chat with a Mentor
If you have a short course or certification question, your Mentoring Team will provide you with a quick answer. To enter a live chat with a Mentor, select the Chat with a Mentor button.
E-mail My Mentor
If you have a detailed course or certification question, your Mentoring Team can provide you with a detailed answer via e-mail. To create and send an e-mail to a Mentor, select the E-mail My Mentor button.
Activate Daily E-mail
Select the Activate Daily E-mail button to begin receiving the mentored Daily E-mail messages. Once this Mentoring is activated, you will receive Daily E-mail messages providing you with questions on information relevant to your course.
Note: Daily E-mail reminders only appear on the Ask My Mentor page when accessed from the Mentoring asset in the catalog. Daily E-mail reminders are not available when Mentoring is accessed from within a course.
Express Guides
While e-learning courseware can help organizations master new technologies effectively, cost-efficiently and on a globally dispersed basis, there is usually a time gap of several months between the announcement of new technologies and the first emergence of quality e-learning courses.
SkillSoft Press Express Guides close that time gap, delivering a cost-effective means of learning new technologies within just a few weeks of the availability of important new technology and certifications.
Express Guides are electronically-delivered equivalents of the student guides that IT professionals receive when they attend instructor-led training classes. They consist primarily of text and graphics and do not contain interactive practice questions or assessments.
Custom content comprises non-SkillSoft courses or customized courses. These courses are available in the Catalog or from a search.
Each course can have a course evaluation linked to it. When you complete a course, SkillPort automatically places a course evaluation learning event in My Plan. Clicking on the link displays the course evaluation form.
Once you complete the evaluation and click the Submit button, the course evaluation learning event is automatically removed from the My Plan area. Completing the evaluation is the only way to remove this learning event from My Plan.
Instructor-Led Training courses are scheduled learning events you attend at a specific time and place. You can select an ILT course from the Catalog or you can have it assigned to you by your training administrator. You can search for ILT courses using Search-and-Learn and add them to My Plan.
An ILT course can have one or more sessions, allowing you to select a time and place to take the course that best meets your training needs. A session may be held at physical location (i.e. a facility and classroom), or it can be a "virtual" session delivered online using tools such as WebEx or Centra.
Enrolling in an ILT Course Session
You can self-register for an ILT course session or you can be enrolled in a session by your training administrator. If you are enrolled in a session by an instructor you will be notified by e-mail of the location, duration, time, and date of the scheduled session. Once you are enrolled in a session, the session is listed under the ILT Sessions I Am Enrolled In section of the Home page.
If no sessions of a course are currently available (i.e. there are no sessions scheduled or all sessions are full), you can add a course to your watch list. When you add a course to the watch list, the session is listed under the ILT Courses I Am Watching section of the Home page.
Note: ILT is an optional SkillPort feature and may not be available on your system.
Communities
Your community is a starting point where you view and post messages to online discussions or hold real-time meetings with your coworkers. Select the Click here to go directly to the community link to view the message boards and chat rooms available in your community.
Note: Communities is an optional SkillPort feature and may not be available on your system.
Chat Rooms
Use Chat Rooms to host and participate in virtual conferences or meetings with one or more people. Select the Click here to view your community Chat Rooms link to go directly to view your community chat rooms. Select a chat room from the list of chats that are available.

To verify you are logged in to a chat room:
-
A message stating "[Your name] has just entered the chat" should appear, and
-
Your username should appear in the in the right-panel.
For assistance with participating in a chat, select the Help button located within the Chat room window.
Message Boards
Use Message Boards to post messages that can be read immediately or viewed at another time. Select the Click here to view your community message board’s link to go directly to your community message boards. Select a message board from those listed to participate in a discussion.
-
A discussion is a collection of messages on the same topic.
-
You can post messages to an existing discussion, or click "Add Discussion" to begin a new discussion (the conference manager must set up the site to allow you to add discussions).
For assistance with posting a message, select the quick-edit help link located within the message board window.
Submit a question by email to a subject-matter expert. Select a topic from the Subject drop-down list (the email is addressed automatically). Fill in the subject line and enter your question in the message box. Click send-mail to submit the email message to the expert.
Note: Ask the Experts is an optional SkillPort feature and may not be available on your system.
KnowledgeCenter portals offer a broad range of complementary resources, including targeted online reference materials from Books24x7®; access to SkillSoft courseware and related content; simulation practice labs; Learning Roadmaps; 24x7 online expert mentoring services; and featured topic spotlights, refreshed regularly, to provide an in-depth focus on particular topical areas.
Note: KnowledgeCenter is an optional SkillPort feature and may not be available on your system.
KnowledgeCenter Learning Events
-
Find Books – Search the Books24x7 library of on-line books for materials that will help you understand your selected topic.
-
Browse Books – View all the references in Books24x7 that apply to the KnowledgeCenter.
-
Selected books – Updated on an on-going basis by SkillSoft Subject Matter Experts, this section may feature new books or books related to the Featured Topic.
-
Code Library – Selected references from the SkillSoft InstantCode Series allow you to quickly find reusable code for your own projects.
-
Practice Labs: Practice Labs contain simulations and exercises intended to enhance your abilities and deepen your understanding of the knowledgeCenter subject. Expert introductions provide you with insights and key pointers to the core skills practiced in each lab. Following each introduction, working in learning environments that replicate real-world job situations, you'll complete hands-on exercises designed so you can build a rounded aggregation of competencies and skills.
-
Project Center: SkillSoft's Project Centers comprise a series of hands-on projects designed to encourage the progressive development of practical skills and expertise. This Project Center contains rigorous challenges that have been developed by our experts.
-
Connect with the Experts: KnowledgeCenters include direct access to SkillSoft’s 24x7 Mentors to help you with your learning. Access Mentors from the home page or from within courses in the Learning Roadmaps.
KnowledgeCenter Features
-
Learning Roadmaps: SkillSoft's KnowledgeCenter Roadmaps provide the user with different paths, to learn the basics, to enhance your skills, or achieve certification. Select the path you want to take and complete the courses.
-
External Links: The KnowledgeCenter provides links to relevant external links on the World Wide Web. The KnowledgeCenter includes links to Certification Requirements and other sources of information.
SkillSoft Customer Support provides 24/7 support to SkillPort users.
Please access the SkillSoft Online Customer Support site to search our solution libraries and FAQs, create a support case or to obtain a list of our international phone numbers.
 Learning Programs.
 (the icon appears when an administrator or manager assigned the course to you).
 button to modify the due date, goals and reminders, or to remove a learning event from your My Plan. You cannot modify the due date or goals for learning events that have been
  to create a new folder in your My Plan view. Use folders to organize your learning events into related categories.
 button to provide feed back on a particular learning event.
 button to view a detailed report on a particular learning event in a separate window. The